
All built and ready to get started?
Congratulations on getting your machine all set up and running! But before we dive in let us explain to you the basics!
These steps are designed to help you get started with our Shredder Basic.
Safety First - The 3 Risks
-
Electricity
Like all electrical appliances, there is a risk of electrical shock if used incorrectly. All our machines are grounded and fused, however, it's important to never get the machine wet, always use a grounded plug socket and never work on the machine's internals without first disconnecting from the power supply.
-
Heat
Shredding plastic causes friction and may cause the motor or shredder box to heat up. Make sure you avoid touching these areas when the machine is turned on.
-
Motion
The point of the shredder is to crush and shred. Never put your hands anywhere near moving parts and if you do need to maintain the machine, do so with the machine unplugged and turned off.
Safety equipment
To protect yourself from the 3 mentioned risks, it's important to always wear PPE (Personal Protective Equipment).
We recommend:
Long-Sleeved Clothing that covers as much skin as possible.
Safety Glasses.
Dust Mask
Well-fitting work gloves.
Close-toed shoes.
It’s important that the user wears tight-fitting clothes, any long hair is tied back and isn’t wearing anything with long cords or other accessories that may get caught in moving parts.
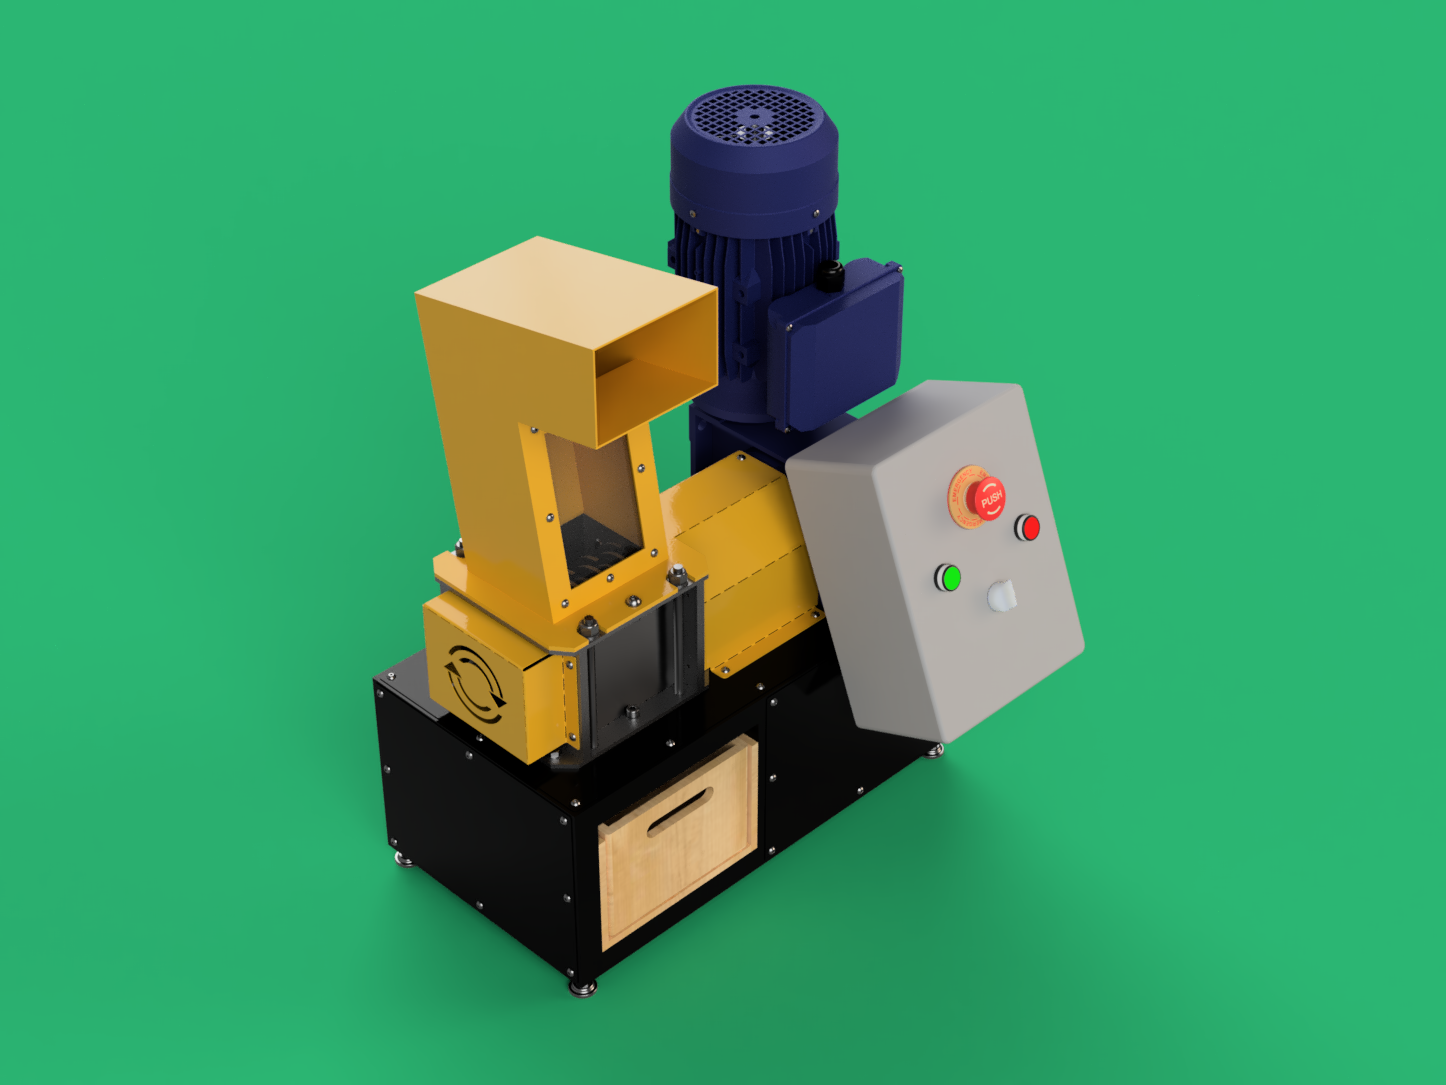
How does the Shredder Basic work?
The Shredder basic uses a 1.5Kw motor to turn several rotating blades slowly inside a shredding box to crush the plastic into flakes that can then be pressed into shape using an Injection Machine & Mould.
The machine has 2 safety sensors that when not pressed prevent the machine from running. To have these buttons pressed the Hopper and Mesh both need to be attached, preventing anyone from accidentally touching the blades.
It also has a safety feature that detects jams, preventing unnecessary wear and tear of the machine should something thicker than it can handle be inserted into the machine.
User Manual
1.0 Introduction
1.1 The Shredder Basic Machine
The Shredder Basic is smaller than the average shredding machine but still very capable of shredding household plastic waste. Designed to convert discarded plastic into 5mm or 8mm granules ready to be sold, or placed into one of our Injection/ Extrusion machines and made into a high quality product using our moulds.
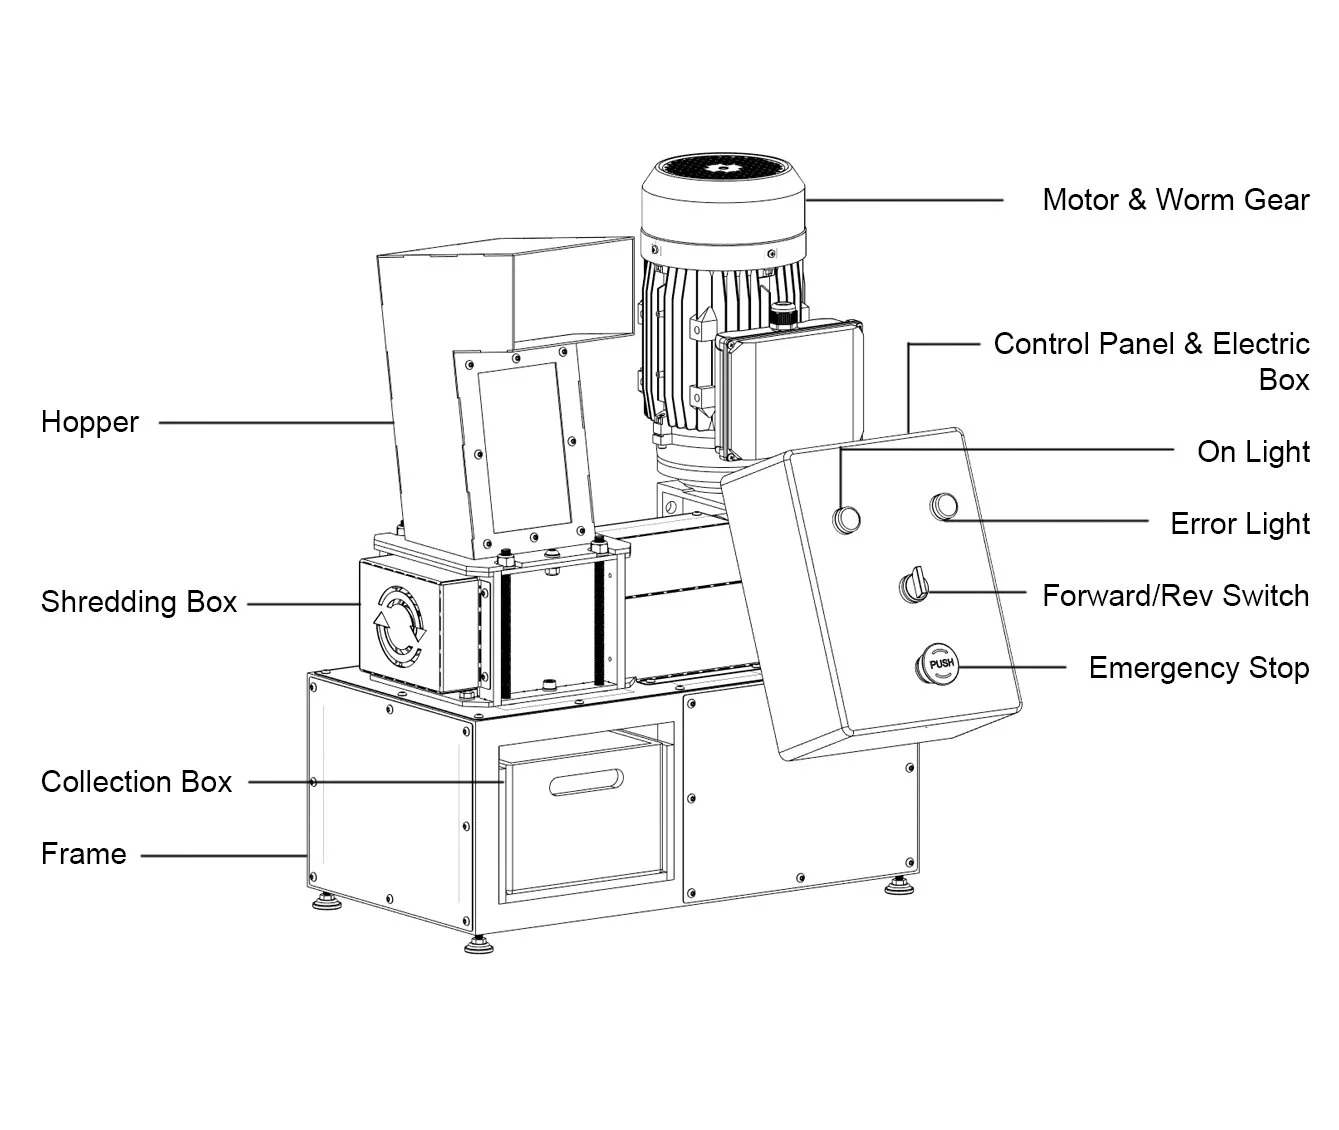
1.2 Components
1.3 Specifications
Dimensions: 47 X 72 X 57cm (L x W x H)
Weight: 60kg
Power Input: 220 V, 50-60 Hz (220V)
Plug: Type G (UK
Shredder: Single Shaft, Slow Speed, Granulator/Shredder Combo
Total Power: Max 1.5KW
Setup: Stand Alone
Motor Spec: 1.5KW Cap/Cap
Gear Box: 1:40 Worm Gear
Max Torque: 105KN
Max RPM: 50RPM
Hopper Opening: 20 x 16 x 29 cm (H x D x W)
Max Thickness of Plastic: 3mm
Output: Upto 20KG/HR (8mm Mesh)
Output Granulate Size: <5mm (5mm Mesh), <8mm (8mm Mesh)
Number of Operators: 1
Shipping Dimensions: 47 X 72 X 58cm (L x W x H)
Shipping Weight: 60kg
Shipping Method: Pallet
Customs Tariff Number: HS84778091
2.0 Operation & Maintenance
IMPORTANT: Never rapidly rotate the switch from forward to reverse. Pause at each step, ensuring the machine has come to a full stop before changing direction.
IMPORTANT: Avoid using the machine longer than 15min at a time. Give it 15min cool down between shredding sessions. This will increase the life of the machine significantly.
IMPORTANT: Do not leave the machine turned on in Jam Mode (Red Light) always reset the machine before leaving it unattended.
IMPORTANT: Do not place metallic objects inside the machine as this will damage the rotating blades.
2.1 Preparations
NOTE: Before operating the machine, make sure to read and understand chapter “3.0 Safety” section in this manual.
There are a couple of things that need to happen before the actual shredding of plastic can happen.
First choose the plastic type - this usually depends on the quantities of plastic piling up in your sorting bags. Make sure you have enough of the same type of plastic, as the shredder has a process (cleaning) between cycles of different plastics.
If your plastic items are too big to fit into the shredder hopper, break them up into smaller chunks first. This can be done with a hammer, scissors or a saw depending on the Plastic.
We often shred by colour - this way plastic can become our paint. But remember, don’t mix different types of plastic to match a specific colour.
2.2 Operating the Machine
Put on your personal protective equipment.
Check which plastic has been used last and clean the machine, if necessary.
Check if the hopper is empty and ready to be filled.
Make sure the On/Off/Direction Switch is in the centre position (Pointing to 0)
Twist and release the Emergency Stop to the “Popped Out Position” (Not Pressed Down)
The Green Light should be illuminated. If it is not, then the safety switches are not pressed. Unplug the machine, and check the positioning of the Hopper & Mesh are firmly attached.
With the Green Light Illuminated, this is a sign the Safety Hopper & Mesh are Firmly in Place. You can now start the machine. Put the machine into reverse (2) to clear any blocked plastic for 5 seconds. Then return the switch to the starting position (0)
You can now put the machine into the forward position (1) and start shredding.
Slowly feed plastic into the hopper. One item at a time.
Routinely check the box underneath the machine ensuring it doesn't get too full. Return the switch to the central position (0) when you want to remove the box.
Once you are finished with the machine, press down the emergency button to cut power.
Jams & Blockages
Sometimes the machine will jam due to the plastic being too thick, too much plastic or something that shouldn’t be in the shredder blocking the blades (metal). The following steps will explain when a jam is detected.
The Red Light will turn on. Likely there will be a deep hum of the motor before this happens.
Return the switch to the centre position (0) and Press the Red Emergency Button. This should lock pressed down and the Red Light should turn off.
Twist the Emergency Button Switch to unlock it. The Green Light should turn back on.
Now put the shredder on in reverse (2) for 5 seconds to remove the blockage.
Now put the switch into the forward position (1).
If the shredder jams again, we need to move on to further problem-solving steps. Repeat Steps 2-4 again. Without putting the shredder into the forward position (1).
Unplug the machine.
Remove the hopper, and clean/remove any large blocked items of plastic.
Return the Hopper, and secure in place.
Plug in the machine and check the green light comes on again.
Put the machine into the forward position.
Troubleshooting
Sometimes the blades don’t grab the plastic. Try pushing the plastic towards the blades with the tool provided. Never attempt to do that with your hands.
If plastic resistance exceeds the maximum torque of the motor, the machine will stop. Basically, there is too much plastic to be cut and the motor can’t make it. Switch the machine off and remove some of the clogged plastic.
If you turn on the machine for the first time, it is possible that the shredder rotate in the opposite direction. This means your phases are not wired correctly. Reverse two phases in the motor. If you don't have any knowledge about electricity seek a licenced electrician.
Overloading the machine sometimes causes the 13amp fuse in the plug to blow. If the machine is totally unresponsive, then check and replace this component if needed.
2.3 Maintenance
To maintain the shredder and avoid the mixing of plastic types, regularly clean the shredder blades and mesh (ideally after every use).
Stop the machine, and disconnect the power supply.
Remove the hopper.
Remove the mesh.
Remove the little shredded flakes in the machine with a brush. Optionally blow it out with pressured air.
Put the mesh back in.
Secure the hopper in place.
Weekly
Check that there are no loose fasteners.
Check for oil leaks around the motor. If there is a leak, seals may need to be replaced.
Check coupling alignment, making sure they are correctly aligned.
Monthly
Inspect bearings and add extra grease if required.
Inspect blades for cracks or chips. Depending on the level of damage, you may need to install replacement blades.
Check the paint, and repaint damage to prevent long term corrosion issues.
Yearly
Deep clean the shredder: Disassemble the box and remove all of the teeth from the axle. This is a good time to carefully inspect teeth for fractures and to apply a small amount of grease to the fasteners to prevent corrosion.
If required, sharpen the blades before reinstalling them.
2.4 Storing Plastic
When you finish working with the shredder, make sure to store your plastic properly, meaning:
Store it in a closed and dry container, so it doesn’t get contaminated with dust or water.
Label which type of plastic is in the container, so it doesn’t get mixed.
Keep it out of the sun, so it doesn’t start degrading in UV light.
3.0 Safety
3.1 Be Safe
This machine might look friendly, but it works with strong forces to shred plastic, so don’t forget to make sure everyone operating the machine learns about its dangers and what precautions to take!
3.2 Dangers & Precautions
Danger: Knives
(Get fingers or other body parts caught in moving knives)
Never operate shredder without hopper and sieve attached!
Danger: Dust
(Inhale dust or microplastic from shredding)
Wear a dust mask!
Ideally: Install a dust collector.Danger: Jumping parts
(Plastic bits can be jump out of the hopper)
Wear safety glasses!Danger: Moving Parts
(Hair and loose clothing can get sucked into motor fan)
Tie long hair and remove loose fitting clothing or jewellery.
3.3 General Instructions
This machine is designed to process thermoplastics only. Processing other materials could introduce additional hazards.
When the machine is used for extended periods the shredder box can get hot. Avoid touching the shredder bo or motor.
3.4 Ancillary Equipment
This machine is not designed to be used in conjunction with any other equipment than what is provided.
Ancillary equipment shall not be mounted to the existing frame.
Any additional equipment used may introduce additional risk which is not the responsibility of Precious Plastic.
3.5 Workspace Hazards
Make sure the machine is standing level on a strong surface during operation. Always make sure to have 80 cm or room all around the machine during operation.
The shredders must be fastened securely to a surface or table to prevent movement of the machine.
It is recommended that an additional risk assessment specific to your space is completed to identify and control risks posed by the machine in your specific context.
It should be noted that the created dust can become very slippery when spread on the ground as a result of the shredding process. As such, regular cleaning of the floor is recommended to control slipping hazards.
3.6 Personal Protective Equipment
Tight fitting gloves that protect your hands from sharp objects.
A work suit or coverall that covers arms and legs must be worn while using the machine.
Sealed safety glasses or a face shield must be worn at all times in the vicinity of the machine to protect from jumping parts..
A fitted N95 dust mask must be worn at all times by all operators.
Ear protection to protect against the loud noises generated by the crushing blades and motor.
Closed shoes must be worn at all times by the operators while using the machine.
3.7 Emergency Situations
It is recommended that an individual risk assessment is undertaken for each specific workspace.
It is recommended that all operators regularly undergo an induction on the emergency procedure associated with their specific space.
3.8 Safety Labels

Safety stickers on machine frame - from left to right:
Hand Crush: Indicates an area of hazard due to crushing
Wear Eye Protection: indicates that eye protection is required when using this particular machine.
Wear Face Mask: indicated that a face mask is required when using this particular machine.
Wear Ear Protection: Indicates that ear protection is needed when using this particular machine.
Wear Gloves: indicates that heat resistant gloves are required when operating this particular machine.
Wear Protective Clothing: indicates that protective clothing is required when operating this particular machine.
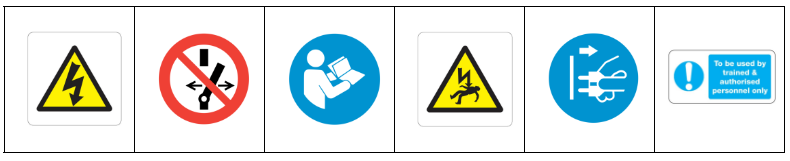
Safety stickers on electronics control box - from left to right:
Electrocution: indicates hazards due to live parts.
Do not switch: do not disconnect during operation.
Read manual: read manual before using the equipment.
Electrical equipment: danger of death.
Disconnect power: disconnect power for service or cleaning.
Authorised personnel only: To be used by trained & authorised personnel only.
4.0 Installation & Decommissioning
4.1 Preparation
Before installation, store the machine indoors away from moisture, rain and dust.
Before any unpacking or assembly occurs, it is recommended that all people involved wear the appropriate personal protective equipment. For this procedure, appropriate PPE includes: eye and hand protection and steel capped boots.
A pre-operation inspection is also recommended in order to plan the procedure and identify any risks specific to the environment or particular equipment.
When lifting other parts by hand, adhere to good practice lifting techniques to reduce the risk of strain and injury.
The machine shall only be connected to power with the included power cable. Any modifications must be checked and approved by Sustainable Design Studio. A 16A breaker should also be installed in the main power box upon installation.
Prepare your tools and materials for the assembly of your machine. For this you’ll need all the parts you’ll find in your kit. To assemble everything together you’ll need the following tools:
17 mm spanner or adjustable spanner
13 mm Spanner or adjustable spanner
Small Philips Head Screwdriver
PH2 Screwdriver
Metric Allen key set
4.2 Decommissioning
Disconnect the machine from the power supply.
Before any dismantling occurs, it is recommended that all people involved wear the appropriate personal protective equipment. For this procedure, appropriate PPE includes: eye and hand protection and steel capped boots.
Use appropriate equipment for handling the dismantled parts - a crane, hoist or similar lifting device is recommended.
Dismantle the product in accordance with all the precautions imposed by the laws in force in the country of use. If required before demolishing request an inspection by the relevant authorities and relative report.
Dismantle the system down to the individual parts.
Proceed with disassembly of the individual components/parts and group them together according to the materials they are made of: (steel, stainless steel, aluminum, electrical parts, electronic parts).
Clean all the disassembled parts.
Dispose off / scrap the separated, segregated individual parts /materials in compliance with the laws in force in the country of use.
5.0 More
5.1 Online Resources
Getting started can be overwhelming. Plastic recycling is a big topic and there is a lot to learn. We do our best to create online tools to help you find more information and resources:
Website
Our website explains everything around the project, from the history and mission, to machines, the projects around it and which options are there to start recycling.
Resources
The Resources is where you'll find video tutorials, tips, drawings and much more on topics like plastic, machines, product design, business and so on.
www.sustainabledesign.studio/resources
Store
The Store is where you can buy new machines, parts and moulds.
www.sustainabledesign.studio/store
5.2 Feedback & Support
Your feedback is valuable to us!
Finding errors and typos on our website? Have an idea on how to improve our machines and moulds? Or other feedback for our solutions? Let us know! So we can improve our services for you and all our other customers.
The problems you encounter, inconsistencies, unclear descriptions or things that just feel like they could be improved is all valuable feedback for us to fix and grow better, together.
If you would like to provide feedback please email us at:
contact@sustainabledesign.studio and title the email “Feedback”